
What is the Microblading Process? Pros and Cons Worth Knowing
Curious about microblading? How does it work? Is it painful? Well, you’ve come to the right place! Microblading is a relatively new concept for getting perfect brows 24/7. Here I cover everything there is to know about it, from the pros and cons to all the questions that are most commonly asked.
What is Microblading?
Microblading is a semi-permanent type of cosmetic tattooing for enhancing the appearance of the eyebrows. The pigment is scratched into the skin in fine short strokes that resemble brow hairs.
Microblading is ideal for those with sparse brows as well as anyone else who can’t be bothered to fill and shape their eyebrows every day! Brow pencils are amazing, but it’s another step in your makeup routine, if you’re looking to speed things up in the morning, microblading may be exactly what you need.
Microblading Process
Microblading is all about creating the best-shaped eyebrows for each individual face. The technicians spend a while drawing and stencilling the best eyebrows you can have in regard to your bone structure and physical angles. Sometimes, the drawing part takes longer than the actual microblading process.
You’ll be lying on your back reminding yourself over and over that the pain is worth it until it’s over! If you’ve ever gotten a tattoo, the feeling is the same.
Microblading vs Eyebrow Tattoos
Microblading, unlike tattooing, is not in the deep layer of skin, but more on the surface. It’s also not permanent, and the colour fades within 18 months up to 2 years depending on how well you follow the aftercare instructions.
Unlike tattoos, microblading has more aesthetic qualities, like faking hair strokes. A really great microblading technician can create far more natural and finer hair strokes than any tattoo artist.
This is because they undergo training that really entails all there is about eyebrows. The kind of strokes, the forms, and how those fit well together in unique face shapes.
What they both have in common is that each process uses a handheld needle/blade that is used to etch the ink on your skin. And believe it or not, microblade needles are far thinner than your average tattoo artist’s smallest ones.
There is, therefore, more of a scratching noise and feeling that goes with it instead of the grungy, buzzing and scraping sensation that comes with tattooing. They both also entail meticulous aftercare steps, but unlike permanent tattoos, whilst the process is very similar, microbladed eyebrows aren’t permanent.
What’s nice about that is that you can choose a different eyebrow shape every couple of years, which works well with the ever-changing eyebrow trend!
The Process
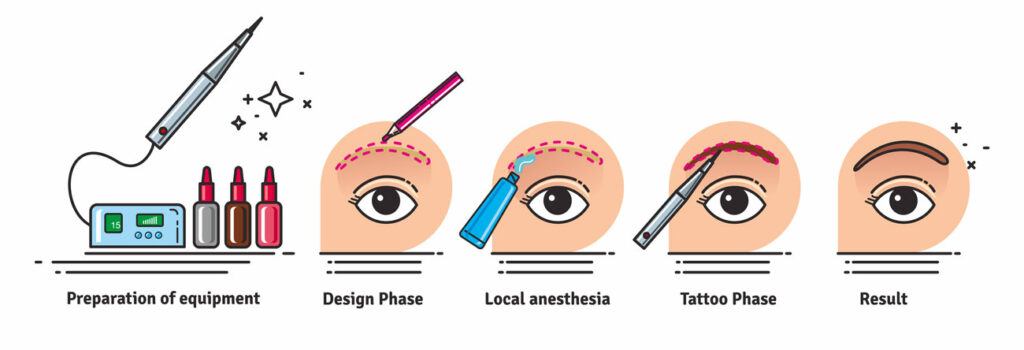
- Your technician will brief you on all the steps. Before you even sit down on the chair, you’ll experience common clinical steps like being asked about any medical conditions, or allergies. Your technician will evaluate if it’s safe for you to undergo microblading.
- Next, your technician will start measuring your face and shaping your eyebrows on paper.
- After that, it’s onto cleaning up the brow area by threading and removing any unwanted hair.
- Next, it’s time to numb the area for treatment. Sometimes, you’ll get more than one application of anaesthesia depending on how well you can tolerate pain. This takes 30 minutes up to an hour using a topical ointment.
- While the anaesthesia is working its magic, the technician will interview you about what you’d like your ideal brows to be. They’ll show you swatches, and samples, and advise you on which styles are possible and which ones will actually suit your unique features.
- When the anaesthesia has fully numbed your eyebrows area, they’ll start working and use their tools to begin measuring the area around the brows, taking into account face shape, symmetry, facial features etc. They’ll draw, and measure, over and over. During that process, of course, they’ll also show you what the sketch looks like and hopefully, you’ll be satisfied!
- Once you’re satisfied with the shape, the technician will begin the needling process. Each stroke is a superficial line in the skin where the colour pigment seeps in and settles. This process goes on for about 15 minutes to an hour, depending on the uniqueness of the client; the face shape and the brows.
- In 2-4 weeks, you’ll get a top-up session to fill in any gaps where the pigment hasn’t worked or healed properly. This is optional, some people have it lucky that the pigment stays perfectly, and others may need the top-up.
Note: The aftercare instruction may vary in steps, but normally, the clinic will give you an ointment and a list of things not to eat or do and information regarding habits concerning your eyebrow area at least until it is fully healed.
Pros and Cons
When it comes to the pros and cons of microblading, I don’t think you need to stretch the imagination to see the most obvious ones!
The most obvious pro is that you get beautiful, long-lasting, realistic-looking brows that don’t need touching for a while and that no eyebrow filler can quite replicate.
And as for the cons, well, the obvious one is that it’s painful! Another con is that microblading is pretty pricey. While you can find good deals, remember the most important thing is to find a good technician or that good deal will be wasted.
Common FAQs
Final Thoughts
I hope you’ve learned what the microblading process is all about, and I hope I’ve answered some of your questions. Microblading is a realistic way to get long-lasting eyebrows that are natural-looking and beautiful.
The brows frame the face, and if doing your makeup every day is a challenge for you, microblading may be the solution you need. Don’t forget, you’ll still need to top up your eyebrows with tweezers or threading.
Hollie xx

About Hollie
Hi, I’m Hollie, and I’m passionate about everything beauty. Over the last decade and a half, I’ve tested thousands of products to bring you the best of the best! I also love bringing you fun and creative beauty looks. Learn more.
Beauty profile – 35, dry, aging skin, focused on aging well with a healthy glow and natural makeup look ✨
- 18 Back-to-School Nails That Will Make Your First Day Special

- The Most Gorgeous Yellow Nail Designs

- May Nail Trend Ideas You’ll Love!

- 22 Patriotic 4th Of July Nails That Wow

- 18 Animal-Print Nails You’ll Fall In Love With

- 22 Trending Flower Nail Inspo for Your Next Mani

- 12 Superbowl Nail Designs for Game Day

- White Nail Designs You Have To Try

- The Rundown on Home Laser Hair Removal Devices

Anastasia Beverly Hills bareMinerals Benefit Cosmetics Bobbi Brown CeraVe Chantecaille Charlotte Tilbury Clarins ColourPop Dermalogica Dior Dyson e.l.f. Cosmetics ELEMIS Estée Lauder Eucerin Fenty Beauty Fresh Giorgio Armani Hourglass IT Cosmetics L'Oreal Lancome Laura Mercier LORAC MAC Makeup Revolution Maybelline Molton Brown Morphe Nars Natasha Denona Neutrogena NYX Origins Peter Thomas Roth PÜR Cosmetics Revlon Sigma Beauty Smashbox Stila The Ordinary Too Faced Urban Decay YSL